Anna Wheaton - Independent Stampin' Up! ®
Demonstrator, Burleigh Waters, Q, AUSTRALIA
Phone 07 55 765 469 Email: wheatonanna@hotmail.com Blog: http://www.nudgeink.blogspot.com/


December 24, 2012

Merry Christmas

Here's a merry banner I made for our lounge room.


Merry Christmas to all my customers and everyone who visits my blog!  May you have a wonderful Christmas, celebrating with family and friends!


Thanks for stopping by!

Anna

December 22, 2012

Christmas Baking

I've made some mini Christmas cakes and packaged them up for neighbours.


Apart from cooking the cakes, this was a pretty quick and easy gift to prepare.


Save that cardboard from your Specialty DSP packs. I covered rectangles of this strong card with Letters to Santa DSP as the base for the cakes.

Stampin Up! cello bags make packaging a breeze.  I even used one around the cardboard layer that the cakes rest on - just to keep the DSP grease free.

The gift tag came together in a flash, using the colours that co-ordinate with the Letters to Santa DSP, and the Apothecary Accents Framelits.

Lastly, I tied the package off with co-ordinating ribbon to give it the finishiing touch!

Stamps:  Merry and Type
Card:  Letters to Santa DSP (retired), Old Olive, Real Red, Whisper White
Ink:  Real Red, Old Olive
Tools:  Big Shot, Apothecary Accents Framelits
Accessories:  Cellophane Bags, Real Red 3.2 mm Taffeta Ribbon, Linen Thread

Thanks for stopping by!

Anna

December 19, 2012

Petite Purse

These cute little purses make such a great gift and are super quick to assemble.

 
This is a one-of-a-kind Christmas packaging idea:  they could hold chocolates, jewellery, trinkets, small gifts.  Then imagine the die for wedding favours or a cutesy for a baby shower or birthday gift.


They are super easy to decorate.  I have added a rhinestone as the 'clasp' and decorated each with a glimmer paper Merry Mini punch.  The flap has been overlayed with Be of Good Cheer paper.

Card:  Gumball Green, Cherry Cobbler, Be of Good Cheer DSP, Silver Glimmer Paper
Tools:  Big Shot, Petite Purse Bigz L die, Merry Mini Punch Pack
Accessories:  Basic Rhinestones


Thanks for stopping by!

Anna

December 16, 2012

Customer cards


I thought you might like to see a couple of cards made for me by my customers.  It's lovely to receive a homemade card and these two were beauties.

Margaret's card combines the Northern Flurry Embossing folder and some watercolour pencils:  A perfect combination for that snowey, wintery feel of Christmas.  I love the softness of the images on this card.


This card is from Jenny, using the bright colours of the Festival of Prints DSP. 


Love that centre piece using the layers of flowers from the Boho Blossoms punch.


Thanks for stopping by!

Anna

December 15, 2012

Clearance Rack Blitz


Dates: 14 December, 2012-21 January, 2013 (while supplies last)

Details
We're temporarily taking over a hundred products out of retirement with discounts up to 70 percent off retail - only while supplies last! Click on the pic below and it will take you to the promotion page on our website.


If you would like to place an order, please email me at wheatonanna@hotmail.com.

Thanks for stopping by!

Anna


December 14, 2012

For my White on White Customer

Some of you may remember that I have made cards before for a customer who loves white on white.  This year I wanted to make something special for her as a gift nd knew she would love the holiday ornament...in white of course!


I didn't go looking for white tulle as I thought the Crumb Cake was a nice contrast.

Have you tried Heat and Stick Powder?  Each ornament was stamped with this powder, heated then dipped in Dazzling Diamonds.

The rosette is made from the Whisper White in the DSP Patterned Stacks.

Thanks for stopping by!

Anna

December 11, 2012

Hand me the Tombow!

Each year I try to introduce some new activities to our Advent Calendar.


This year, for the first time, we tried a gingerbread house.  It was a kit - from Ikea (!) - yes, it was flat packed.  It took more than one pair of hands to hold everything in place while the icing set and gripped.  Picture the whole family crowded around a small house....it's important to be close at Christmas, right?  Tombow would have been much quicker, but probably not as tasty.
 
 
Our end result was fairly plain compared to some I have seen but I didn't want to add too many lollies as you know we'll eat them.  Plus I ran out of Tombow....joking.
 
Thanks for stopping by!
 
Anna

December 9, 2012

Tag Time

Yesterday was our team meeting and shoebox swap of Christmas tags.  I was so pleased with the variety of tags.


Here are the designs:

Some great tags for kids...this one from Angela.  Love his carrot nose and coal teeth!


You gotta have a Santa!  This one is from Jenny.  Glimmer Paper is a must for highlighting Christmas projects.


And one for a baby's first Christmas, made by Nadene.  So cute with their rhinestone eyes and soft colours.


Got sweet treat cups?  This one was Teresa's.  Love the crispness of the white against the Real Red.


Sweet treat cups are great for all sorts of little goodies:  food or otherwise.


An elegant tag from Jenny using Early Espresso Embossing powder and Gold Embossing powder.


And the little tags I showed in yesterday's post.  There's that Glimmer Paper again!


And lastly a CASE of a Shelli Gardner tag:


I think you'll have to agree that we are well prepared for Christmas!

Thanks for stopping by!

Anna

December 8, 2012

Cute Tags


I held a team meeting today where we each prepared a shoebox swap of a Christmas tag.


This is one that I prepared using the ornament punch. 

I punched through Whisper White folded in half so that the fold was at the top of the ornament.  A single patterned piece is then snailed on top.

Have you seen the Snow Flurry Bigz die?  I cut the smallest of the three images in vellum and in silver glimmer paper to create the snowflake.  The glimmer paper is fantastic for Christmas projects!

The centre is the circle from the Itty Bitty Shapes pack, punch out of red glimmer paper.


And here are four of them together!  I'll show you some of the other projects soon!

If you wish to order anything so that you can get your Christmas projects moving, give me a call or email me at wheatonanna@hotmail.com

Thanks for stopping by!

Anna

Thanks for stopping by!

December 7, 2012

Cutie

We made this cute box at class last night.  Not my design - I found it on Becky Roberts' blog which can be found HERE.


Becky's design was measured to fit a cute tea light but I was wanting to box up some chocolates.  When I tried out Becky's measurements, they were the perfect size for four Whittakers Chocolates (You know Whittakers - they make those yummy peanut slabs.)


These chocolates are easy to cover with DSP to help co-ordinate the overall effect.  What a cute gift!

Note the little piece of window sheet in the lid - this really helps to give the project a finished look.

Card:  Gumball Green, Be of Good Cheer DSP, Window Sheets
Tools:  Decorative Label Punch
Accessories:  Gumball Green Stitched Satin Ribbon, Chocolate

Thanks for stopping by!

Anna

December 4, 2012

It's a wrap with our DSP

I found the perfect gift for a friend of mine that needed wrapping.  Stampin' Up!s DSP came to the rescue to add elegence to the presentation.


It's a 'what the heck'/just because kind of gift so the 'Hello' sentiment was perfect.

I created a simple co-ordinated card in an instant just by using a small piece of DSP and a little punched flower.


And the card tucks neatly into the ribbon.


Stamps:  Elementary Elegance (retired)
Card:  Love Letters DSP (retired), Whisper White
Ink:  Riding Hood Red
Tools:  Itty Bitty Shapes punches
Accessories:  Basic Pearls, Basic Black 3.2 mm Taffeta Ribbon

Thanks for stopping by!

Anna

December 2, 2012

Our Stampin' Trimmer is here


The New Stampin' Trimmer is here!


 Introducing the new and improved Stampin' Trimmer! Although paper trimmers are a common crafting tool, this trimmer was designed exclusively by paper crafters for paper crafters - and because it was made by Stampin' Up!, you know it's a cut above the rest!

Please note: the cutting and scoring blade refills will be available early in December.


Features of the All-New Stampin' Trimmer
  • An extra-wide 15.9 cm cutting base and an extended 39 cm ruler
    • The extra-wide cutting base provides a large work area and is marked in 4 mm increments, allowing for small measurements.
    • The right-side grid helps you measure and cut very thin strips.
    • The extended cutting arm has a stabilizing leg to provide a sturdy and steady cutting surface for longer cuts.
    • When fully extended, the extended cutting arm sits flush with the trimmer base, providing more accurate and consistent measurements across the entire surface.
    • All rulers and measurements on the base are printed under a plastic cover so your measurements won't wear off.
    • The base has nonskid feet, which keeps the Stampin' Trimmer securely in place on your work area.

  • A full 30.5 cm cutting and scoring track
    • The extra-long cutting track has space at the top and bottom so you don't have to take the cutting and scoring blades out when you're not using them.
    • The track gives you enough space to cut or score a full 30.5 cm without having to remove or switch out handles.
    • The cutting track locks in place for secure storage or transport.
    • The track includes an insertion point for cutting and scoring blade handles so you can easily insert handles into the cutting track.

  • Specially designed handles and cutting track to ensure straight cuts
    • The hook on the scoring and cutting blade handles keeps the handles stable so the cuts are as straight as possible.
    • Handles come in two colours: dark for cutting, light for scoring.
    • The precision tip on the cutting blade allows you to pinpoint precisely where you're cutting.
    • The point on the side of each handle shows you where the blade will cut, making it easy to see exactly where your cuts and scores will begin.

  • Storage compartment under base
    • The storage compartment holds scoring and cutting tools such as a Bone Folder, Simply Scored Stylus, extra scoring and cutting blades and even business cards.
    • Separate compartments within the storage compartment keep your tools organised, and the clear cover makes it easy to see what you've stored.

  • Product details: item 129722; $49.95
  • November 30, 2012

    Market Goodies


    I was very busy last week making things for a local market. 


    These Ferrero cards always look cute in any pattern of DSP.   They showcase the colour and pattern combinations beautifully.


    The tutorial for these can be found on Becky Roberts' blog under Project Tutorials.

    And of course you can't go past the ol' Rudolph Nose Repair Kit.  This idea can be found....on everyone's blogs.


    There are plenty of hidden gems in our catalogues and one of them is these skinny cello bags - great for packaging M & Ms, Smarties, licorice sticks etc.


    Tie them up top with a ribbon and add a stamped greeting and you have an inexpensive but fun gift.


    I have never had a huge success at any market and didn't sell very much.  These goodies are now in the staff room at my husband's work.  Maybe I'll have better luck there!

    Thanks for stopping by!

    Anna

    November 28, 2012

    Sunday Market

    Here's a few pics taken on my phone (clever huh?) of our table at the market on Sunday.

    Chocs and Pops!


    Tags, Magnets and Notepads!


    Another angle! plus some Ferrero boxes....


    And a display corner...not so blurry in real life!


    I'll show you some close ups in my next post.

    Thanks for stopping by!

    Anna

    November 26, 2012

    Sophie's Wreath

     
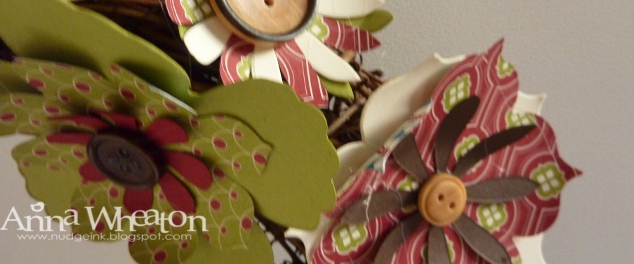
    Sophie Zadeh from Stampin' Up! showed us a beautiful wreath at Brisbane's Heartfelt Event.


    I loved the mix of Cherry Cobbler with Early Espresso and Crumb Cake.  Very earthy.  So I set out to make my own.


    I managed to find a wreath form at Riot which didn't need covering as the natural branches looked perfect behind the flowers.


    I then made a variety of flowers, 'in front of the tele' as Sophie suggested, combining different sizes and shapes run through the Big Shot.  Then to give myself an idea of arrangement of sizes and colours, I sat them on the wreath before using any glue.

     
    I had about five of the biggest size flowers so I placed them first and then arranged the medium flowers around, avoiding similar flowers side by side.  I saved some little flowers for the end, to fill in spaces once the flowers were glued.


    Once all the flowers were glued on, using a hot glue gun, I finished each one off with one of our wooden buttons.  (A bit of glue oozing through the holes here and there!)


    All up, it was quite a quick project.  We'll hang it on the front door come December.
     
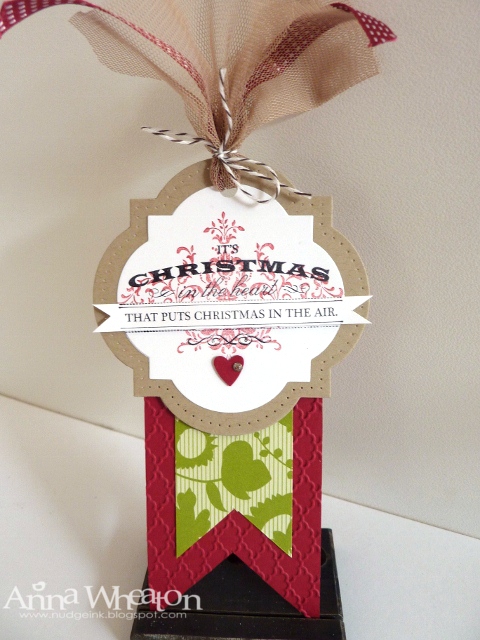
    Card:  Festival of Prints DSP, Cherry Cobbler, Early Espresso, Lucky Limeade, Crumb Cake, Very Vanilla
    Tools:  Big Shot, Fun Flowers Bigz die, Blossom Party Originals die
    Accessories:  Naturals Designer Buttons, Early Espresso Scalloped Tulle
     
    Thanks for stopping by!
     
    Anna